
My favorite Pumpkin Cheesecake has a gingersnap cookie crust and smooth pumpkin filling and couldn't be easier to make.

 Anyone can make Pumpkin Cheesecake
Don't be intimidated! It looks impressive but is crazy simple to make and is my go-to Thanksgiving dessert when I want something a little extra special. Honestly, as much as I love pumpkin pie, I'd choose Pumpkin Cheesecake first, any day.
Try my other pumpkin recipes, like Pumpkin French Toast, Pumpkin Cream Cheese Muffins, Pumpkin Snickerdoodles, Pumpkin Roll, and Pumpkin Mug Cake!
How to make Pumpkin Cheesecake:
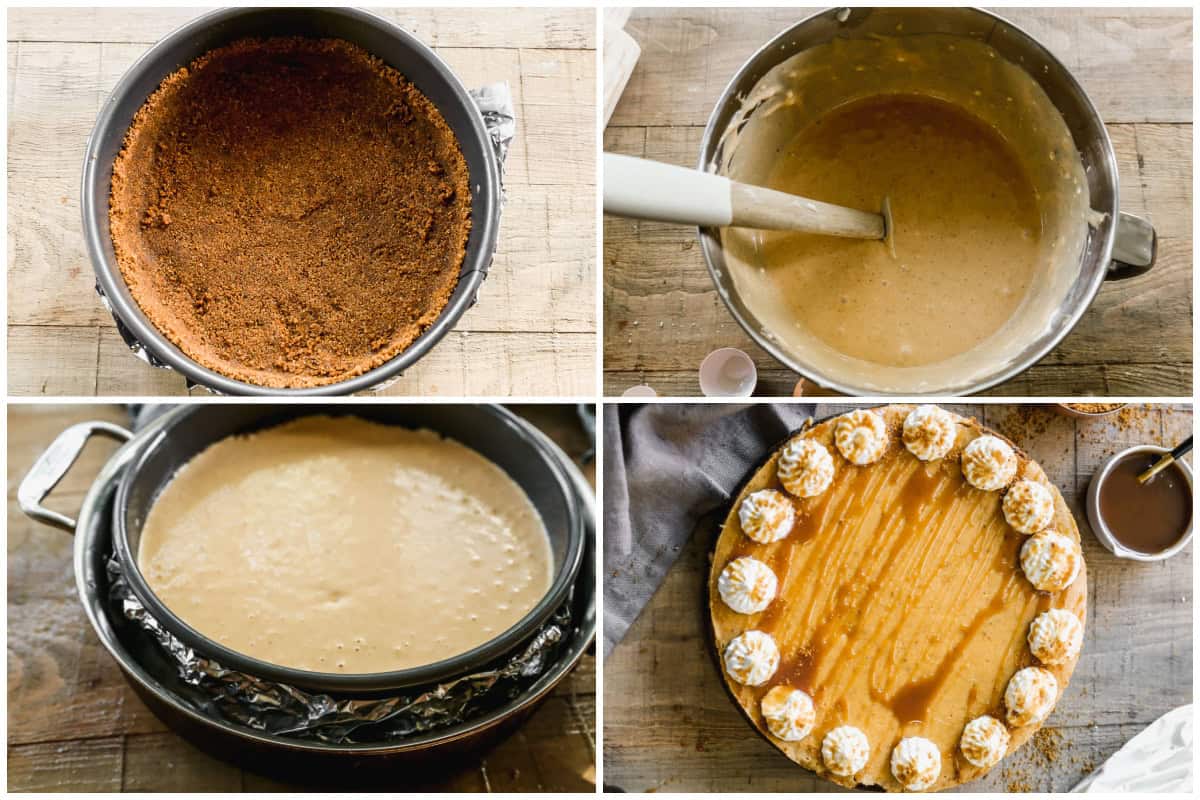
Prep Springform Pan: Cover the outside bottom of an 8-inch springform pan with a double layer of aluminum foil, or use a cheesecake wrap.
Make Gingersnap Crust and press the crumb mixture firmly into the bottom and half way up the sides of the pan. Bake crust at 350 degrees for 5 minutes.
Mix Cheesecake Filling: Add cream cheese to a mixing bowl or stand mixer and mix until smooth. (It's imperative that the cream cheese is at room temperature, so there are no lumps in the batter.) Add sugar and mix until smooth. Add eggs one at a time. Add pumpkin and spices and mix (don't over mix). Pour the batter into the pan, over the prepared crust.
Place in a water bath: Place the cheesecake pan inside a larger pan. Pour about 1 inch of very hot water into the pan, around the inside edges of the roasting pan.
Bake: Carefully place cheesecake, in the water bath, into the oven and bake for 60-70 minutes, or until the sides of the cheesecake have set and the center is just barely jiggly. Lift the cheesecake out of the water bath, remove the foil from around the pan, and allow cheesecake to cool completely on a wire cooling rack. Then refrigerate the cheesecake for several hours before serving.
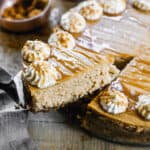
Serve: I love to decorate this creamy Pumpkin Cheesecake with a little bit of piped whipped cream and caramel sauce before serving.
A Note About a Water Bath:
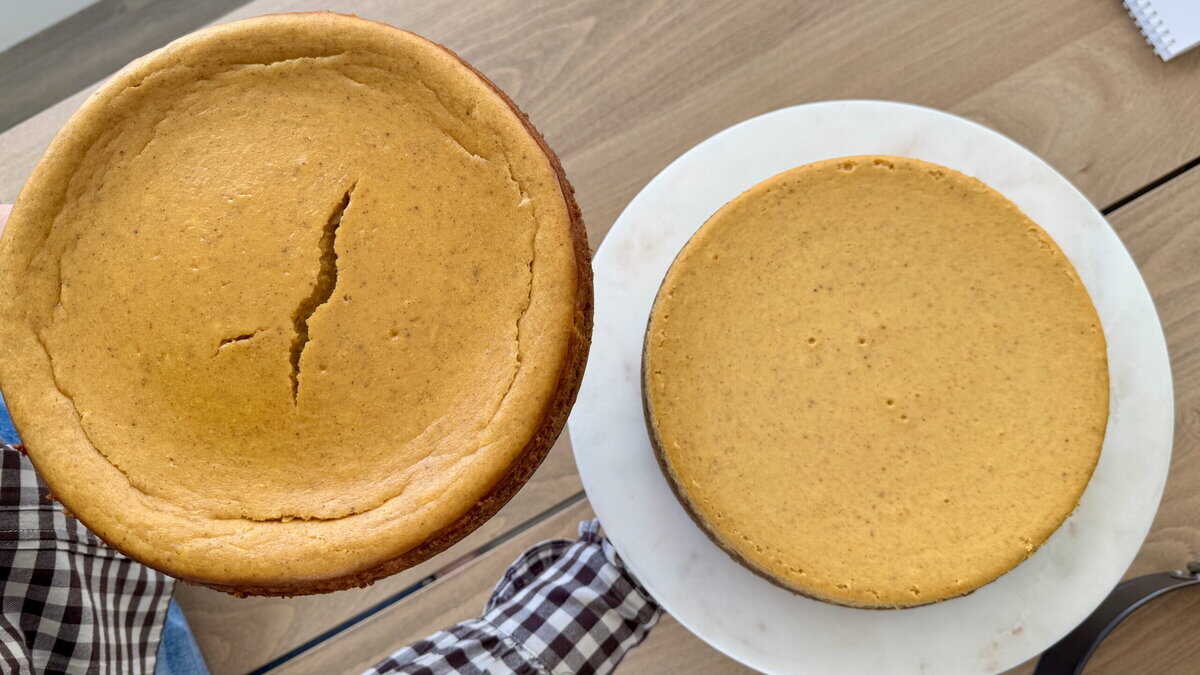
Some recipes for Pumpkin Cheesecake don't require a water bath, but I've tested it many times, both ways, and I still think a water bath is the best method for perfect, smooth and creamy texture. All that a water bath means is baking the cheesecake inside a larger pan that has a some water in it. The humidity and bubbling of the water while the cake bakes helps the cheesecake cook evenly, with a creamy texture, and helps prevent cracks in the surface. I use a Cheesecake Wrap to make it even easier, but all you really need is aluminum foil!
If you don't want to use a waterbath, make sure to place your springform pan on top of a baking sheet so any melted butter that escapes doesn't drip all over your oven. For a pumpkin cheesecake with no water bath, just follow the same baking instructions and you will still get a beautiful and delicious cheesecake! Here is a comparison picture of this pumpkin cheesecake cooked in a water bath and without. The one without has a couple cracks, but didn't affect the taste at all!
Follow me for more great recipes
Pumpkin Cheesecake
Equipment
Ingredients
Gingersnap Crust:
- 2 cups finely ground gingersnap crumbs (about 10 ounces)
- 6 Tablespoons unsalted butter , melted
Pumpkin Cheesecake:
- 1 cup granulated sugar
- 3 (8 oz pckgs) full fat cream cheese , at room temperature
- 1 teaspoon vanilla extract
- 1 cup canned pumpkin puree (or homemade pumpkin puree)
- 3 large eggs , at room temperature
- 1 1/2 teaspoons ground cinnamon
- 1/4 teaspoon ground cloves
- 1/2 teaspoon ground ginger
- 1/4 teaspoon ground nutmeg
- Whipped Cream , for topping, optional
- Caramel sauce , for topping, optional
Instructions
-
Preheat oven to 350 degrees F.
-
Gingersnap Crust: Use a food processor to crush the cookies into fine crumbs. Measure out 2 cups of crumbs and pour them into a mixing bowl. Add ¼ cup sugar and melted butter and stir well to combine. Press the gingersnap crumb mixture firmly into the bottom and about half way up the sides of an 8-inch springform pan.2 cups finely ground gingersnap crumbs, 6 Tablespoons unsalted butter
-
Prep Cheesecake Pan: Cover the outside bottom of the springform pan with two layers of aluminum foil, securing the foil up the outer sides of the pan. (Or, skip this step and place the springform pan inside a cheesecake wrap).
-
Bake the crust for 5 minutes. Remove from oven and set aside while you make the cheesecake filling.
-
Pumpkin Cheesecake batter: In a large mixing bowl beat the cream cheese with an electric hand mixer until smooth. (It's essential that the cream cheese is softened, so that there are no lumps in the batter). Add the the sugar and vanilla and mix until smooth. Make sure to scrape the sides of the bowl as needed. Add pumpkin, eggs, cinnamon, cloves, ginger and nutmeg and mix until smooth, but don’t over mix. Pour the filling into the prepared crust.1 cup granulated sugar, 3 (8 oz pckgs) full fat cream cheese, 1 teaspoon vanilla extract, 1 cup canned pumpkin puree, 3 large eggs, 1 ½ teaspoons ground cinnamon, ¼ teaspoon ground cloves, ½ teaspoon ground ginger, ¼ teaspoon ground nutmeg
-
Place in a water bath: Place the cheesecake inside of a larger oven-safe pan. Add about 1 inch of very hot water around the inside edges of the larger pan. (The humidity and bubbling of the water while the cake bakes helps the cheesecake cook evenly and helps prevent cracks in the surface of the cheesecake). The water bath is recommended but optional. See notes.
-
Bake: Bake for 50-60 minutes, or until the sides of the cheesecake have set and the center is just barely jiggly.
-
Cool: Remove cheesecake from water bath, remove the foil from around the pan, and allow cheesecake to cool completely on a wire cooling rack. Then. refrigerate the cheesecake for several hours before serving.
-
Remove springform pan: Once the cheesecake has chilled in the fridge, remove the pan sides (I like to gently run a dull butter knife along the inner edge of the pan before I release the springform pan sides).
-
Serve with caramel sauce (homemade or store-bought) and whipped cream on top, if desired.
Video
Notes
Nutrition
Follow Me
I originally shared this recipe October 2018. Updated October 2023 and November 2025.
from Tastes Better From Scratch https://ift.tt/5pt9jvU subscriber.email_address }}